Managing Environment Variables and Flavors in Flutter: A Guide for Android & iOS
Establishing multiple environments in app development is essential for thorough testing, smooth deployment, and the overall strength of the final product. By separating development, staging, and production environments, developers can perform in-depth testing, identify and fix bugs, and adjust configurations tailored to each setting. This approach supports concurrent development, client presentations, and user acceptance testing, ensuring the application meets expectations and functions efficiently. Moreover, it facilitates quick rollbacks, adherence to industry regulations, and scalability assessments. Ultimately, multiple environments lead to a more dependable and robust product, improving the entire development process.
We’ll use the flutter_dotenv flutter package to expose environment variables to your Flutter app, which supports iOS, Android, and the web.
Let’s get started by creating the Flutter app. I’ll assume you already have Flutter and Dart installed on your machine. Follow these steps to create an empty flutter project (say flutter_multiplatform) using VS Code.
Yay! Your app should be ready to run using the command below in your terminal, and select either simulator or emulator (assuming you’re using a MacBook):
flutter runThe next step is to add the flutter_dotenv package to your pubspec.yaml file:

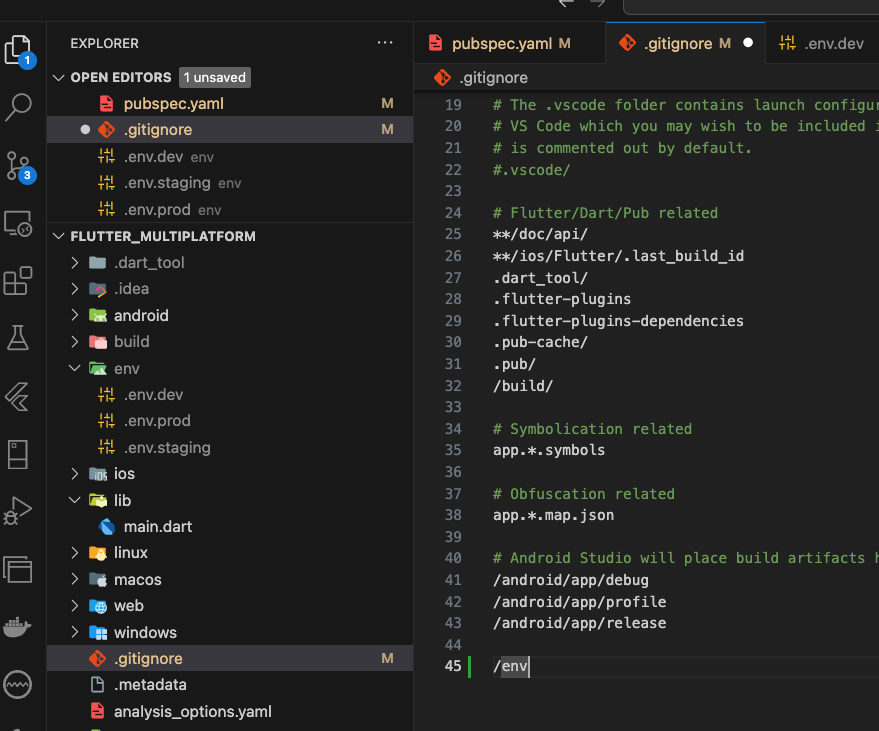
Now, we will create .env files in the env directory of your project directory. These files will store your environment variables depending on your flavors. Let’s add .env.dev , .env.prod , and .env.staging files, and add a sample environment variable (let’s say APP_ENV and assign their corresponding environment name).

The next step is to add /env to the .gitignore file and also add env to assets in the pubspec.yaml file.

Load the Environment Variables
In your lib directory, create a environment.dartfile to load the appropriate .env file based on the flavor specified at build time.

At this point, we need to load the environment.dart in your main.dart file.

Create Flavors for iOS
Setting up flavors for iOS in Flutter requires configuring Xcode to recognize and build different flavors (or schemes). Here’s how you can do it:
Open your Flutter project in Xcode by navigating to the ios directory and opening the Runner.xcworkspace file.
Click on the Runner in the root directory and then right-click on the Runner in the targets for duplication.

You’ll notice a Runner copy created, and the goal is to rename this with your flavor suffix. You’ll also notice that Runner copy-Info file is also created as shown in the image below.

Rename Runner copy (with a double click) to RunnerDev , and Runner copy-Info to RunnerDev-Info.plist. Repeat the same process for RunnerStaging. Also, rename the Runner copy-Info2 to RunnerStaging-Info.plist.

We should have the resulting files as shown below:

Assign plist to Targets
Click on the RunnerDev then go to the Build Settings tab, and search for info.plist File. Double-click on the value under the Packaging section on the right side next to Info.plist File.

Rename Runner copy-info.plist to RunnerDev-info.Repeat the same step for RunnerStaging.

Create Schemes for Each Flavor
Navigate to manage schemes as shown in the picture below:

Duplicate the current scheme for each flavor:
If you have other schemes apart from the Runner, your life would be easier to remove them first before continuing. In my case, I’ll remove Runner copy by selecting it and clicking on the — button. Then I’ll duplicate the Runner and rename it RunnerDev and another as RunnerStagging.

Result:

- Click on Runner, and then
+button > Duplicate Scheme > Rename toRunnerDev. - Repeat this for other flavors -
RunnerStaging).

Resulting outcome:

Select the scheme and click “Edit” as shown below

- In the “Run” section, ensure that
RunnerDevis assigned as the executable forRunnerDevas shown below:


Bundle Identifier for each environment App
In order to assign Bundle Identifier to each of your targets, select the project, then select the target you want to name. Click on the Build Settings tab then search Product Bundle Identifier. Double-click on the value and add the flavor suffix ( dev and staging)

Repeat the same for staging:

Assign the corresponding FLAVOR to each Runner
The next step is to assign the corresponding FLAVOR to each runner using the user-defined settings.
Click on RunnerDev target, and then click on the + button to select Add User-Defined Setting.

Enter DART_DEFINES in the textbox that opened.

Now, we need to assign base64 encoded string to this variable. Open your terminal, and run the following code for each of the flavors, that is, dev, staging, and prod.
echo -n "FLAVOR=dev" | base64This will produce RkxBVk9SPWRldg==
Assign this value to the DART_DEFINES by double-clicking on the right side, and paste this value.

For staging:
echo -n "FLAVOR=staging" | base64This will produce RkxBVk9SPXN0YWdpbmc=

For prod:
echo -n "FLAVOR=prod" | base64This will produce RkxBVk9SPXByb2Q=

If you need to pass more Runner specific values at build time, you can add the variables using:
echo -n "FLAVOR=prod,API_BASE_URL=https://api.example.com" | base64The resulting string can then be assigned to the DART_DEFINES.
Create Flavors for Android
For Android, add this code to android/app/build.gradle file as shown
flavorDimensions "environment"

    productFlavors {
        dev {
            dimension "environment"
            applicationIdSuffix ".dev"
            versionNameSuffix "-dev"
        }
        staging {
            dimension "environment"
            applicationIdSuffix ".staging"
            versionNameSuffix "-staging"
        }
        prod {
            dimension "environment"
        }
    }
Time to Test!
Update main.dart file:

Save all your changes and open your Flutter project in Xcode by navigating to the ios directory and opening the Runner.xcworkspace file. Click on the current Scheme shown in the screenshot below, select the Scheme you need to run, then click on the play ( ▶) button to run the app.

Yippee! Your app is now running. Now, you can repeat the same steps for staging and prod environments.

For Android:
Run this command in your terminal, and you can specify whatever flavor you need to run:
flutter run --flavor staging --dart-define=FLAVOR=staging
Other flavors can be run using:
flutter run --flavor dev --dart-define=FLAVOR=devflutter run --flavor prod --dart-define=FLAVOR=prodGbaski!
Congratulations! You’ve successfully created environment variables and flavors for an Android and iOS Flutter app.
P.S. If you’d like to see a video version of this article, feel free to drop a comment below! I’d love to hear your thoughts and create a visual walkthrough if there’s enough interest.